About Me

My photo
Michigan/Arizona, United States
I am a textile artist who loves to design fabric by painting, printing, stamping, and manipulating cloth.
Showing posts with label "creating'" fabric. Show all posts

Sunday, April 22, 2012

And More Fabric


     On this piece the stencil outlines show clearly in the background.  I really want to start using natural materials as "masks" (in AZ leaves and small flowers are in short supply), but will have to wait until time and weather cooperate here in MI.


     Here I tried using artificial flowers over the paint to make my initial print, but unfortunately, the silk flowers were too transparent to shut out the sun's rays.  There were some partial prints, but nothing very distinct.  Oh well, I went ahead and stamped over it with my own "flowers."

Thursday, April 19, 2012

New Fabrics

     Just before leaving Arizona, I experimented with a new process (for me) using my old standby fabric paint--Setacolor.  Although I had always known about its sun-printing qualities, I had never tried it out.  OH MY!!!!  Now I'm hooked, big time.  However, what was easy in AZ (with 10 hours of bright sunshine nearly every day) is going to be a challenge here in Michigan--especially in the unpredictible spring weather.  Luckily I did print up several pieces before my return to gray skies:


     I first painted my base (recycled white sheets) with several shades of green Setacolor and placed two or three plastic stencils across the surface.  I then carried the print pad (plywood covered with felt) out onto the back padio and placed it on a table in full sun. It didn't take long for the prints to appear, but I waited until the paint was completely dry before removing the stencils.  The wierd thing is--the lighter areas appear under the areas that are covered.  Hmmmm.  After heat setting, I printed directly on the fabric using the same stencils and some of my stamps.  This is really a fast and fun process!


      Mipad Cover using the new fabric.  I love it!

Saturday, February 4, 2012

"First" Quilt

     I have been BUSY, but not with my camera!  I keep forgetting to take pictures of the many things that I have been doing every day:  finishing another Prayer Flag; teaching fabric painting to a small class from my quilting group (larger class next Thursday); cutting and putting together blocks for my quilt; and starting my second 12 x 12 piece.  Anyway, here is my "quilt" pinned onto my design wall.


     I may still switch some blocks around to balance the colors, and I'm considering removing one row to make the quilt itself smaller and use the remaining blocks for a pillow.  I could hang the quilt in my bedroom here in AZ and put the pillow on my bed.  Still considering. . . .

Sunday, January 22, 2012

First "Scratch" Quilt

  Since joining the quilting group at my RV park in AZ, I am challenging myself to create enough of my own hand-painted fabric to construct a small quilt. I decided to start with 8 fat quarters using three basic colors:  purple, green, and yellow. 


Saturday, January 21, 2012

Another Quickie

     I'm really trying--to get back into blogging everyday (opps, skipped yesterday--went on a (quilt) shophop, visited a really impressive Art Quilt Show in Chandler, AZ, had a super time, and spent some money).  I also have to start remembering to take more photos of my work in progress--out of that habit, too.


     This potholder was made using the simple collage, messy stitching method I used to make some of my stash boxes, but the bindings were new for me.  Back in MI when I constructed other holders, I had lots of fabric to make the bias edges--here my stash is limited, so I purchased a pack of blue tape.  Not happy with the look of the plain blue, I dug out my small eraser stamps (used this summer in several of my journal posts) and stamped along the length of the tape with three colors of fabric paint.  I'm very pleased with the results and will definitely use this process again!

Sunday, December 4, 2011

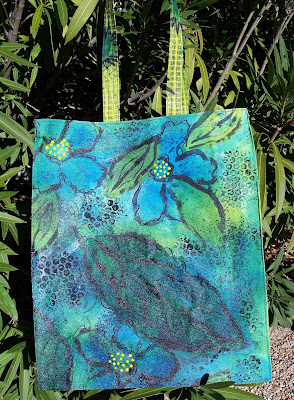
Painted Totes

    Last week, I spent my time painting canvas and fashioning the results into totes.  I'm not super happy with the results, but I had fun doing it.  On Sunday, I was up in Carefree, AZ for my younger daughter's birthday, and I took my totes and camera out into the scrub for some pictures:


     I'll probably try to sell these here at the Shopper's Market.  Right now I'm gelatin printing and experimenting with some new techniques.  Also going to try to get back into the habit of blogging more often!

Monday, October 17, 2011

More Fabric

     Yesterday I worked hard finishing up the printed fabric into pieces ready to be made into covers. 


     Another one with leaves:  I  had carved a new stamp last week and used it over the entire surface.  The backing isn't very impressive--simply leftover paint drops from the "mother" fabric.


     OK.  Another green with leaves.  Hmmmmm.  This one started out with me drawing on the white surface using Elmer's blue school glue (which is water-soluble).  After letting the glue dry thoroughly, I added paint and let it dry again.  Next, I ironed the whole thing to heat set it and then washed it in the machine to remove the glue.  I like the results.  The backing is simply a wash of the same colors. 


     This one is different--collaged scraps of commercial fabric.  These are really fun and easy to create.


Sunday, October 16, 2011

Busy, Busy

    For the last several weeks, I have been painting and stamping fabric in preparation for developing a new product--something I am calling Mipad Covers. 


     The leafy green fabric on the left has been "sandwiched" and quilted, while the lighter fabric on the right  has been quilted separately onto a felt backing.  After cutting each into the correct size, they will be fused together to become a well-padded piece ready to be finished.


  And the completed cover.


     This shows the attached velcro strips which holds the flap in place (the scratchy part of the velcro is on the outside and shouldn't ever come in contact with the electronic pad).  I have about five more fabric sets to finish before taking them into the shop.  I'll be back.

Sunday, October 9, 2011

More Wine Caddies

,    After rescuing another piece of sheer floral fabric from the bin, I once again spent a lot of time free-motioning--this time with black thread.  Sounds like I'm complaining (?), but I really love the whole process.


     This shows the piece after stitching, cutting, and preparing the edges to become a wine caddie. 


     I added some dots and dashes of black dimentional paint to the flower centers and leaves for more texture (if you click on the photo, you can probably see these better). An old wine bottle helps to enhance the final result--I always display the caddies this way at the shop.


     More completed caddies.  I have one more in the works and then I'll be starting a new set of projects.  No rest for the wicked, as my mother used to say. . . .

Thursday, October 6, 2011

Playing with Old Fabric

     I was digging through a box labeled "sheer scraps" when I happened across a piece that caught my eye.


     I have no idea when or where I acquired this, but I love the flower shapes and the graceful stems flowing across the black background.


     After layering the sheer onto black "suede," batting, and backing, I free-motioned with gold metallic thread across the whole piece.  Unfortunately, the white flowers grayed a bit against the black, so I opened my new package of Lumiere minis and picked a bottle of Pearl White. (Actually, I put down a layer of plain old white craft paint on each flower before adding the Lumiere--this stopped the more expensive stuff from simply sinking into the fabric.)  After everything dried, the texture of the flowers felt like satin!  Yummy.


     And  the completed fabric became a wine caddie for the shop.  I usually try to make quite a few new and different designs of these to be ready for Christmas (more in the planning stages!). 

Monday, October 3, 2011

The Journal

     I first sketch/painted a piece of left-over gelatin print (again) using a black Sharpie and various fabric pens.  This time I selected analogous colors that would blend in with the background and not make it muddy (you can best see the original print colors in the large oak leaves).


     I really enjoy this process, especially using leaves.  Notice the sample color dots up in the upper left-hand corner--this really helped me see how the colors would work on the previously-dyed fabric.  After completing the design, I made a quilt sandwich and free-motion stitched with black thread across the whole piece.  Then I constructed the journal as usual:


The front


and the back (notice I included the color dots).  The colors of the whole piece are more intense on the actual fabric.  When I took the photo, there was a shadow on the right half and I had to lighten it with Photoshop, making the final result a bit faded.  Darn.  Oh well, I still had fun creating the design.

Friday, September 16, 2011

Trial runs and another fabric

    I tore the flower fabric into smallish squares, made some simple flowers (pieces of fabric fused together, free-motions stitched, and cut out), and now I'm deciding on a background. 


     Yesterday, I thought this background was OK, but this morning it seems a bit dull.  Hmmmm. . . .


     I need to get a larger piece of the light purple fabric before I make a choice--also some smaller black buttons.  Nothing is sewn down yet.


         I'm still not sure--this one may be too bright.  I'm going to sew down the flowers and buttons, then mount each piece to 5 x 5 foam core and lay them out together on each background to evaluate.

     And here's another piece inspired by Sew Wild.  Again, I used an old gelatin print on which to do my scripting.  Because the print was made last October using fallen leaves, I decided to write my thoughts about that wonderful season.  I'm not sure what I'll do with this one--probably stick it back in the "check me out" drawer and wait for inspiration.


     I also plan to try this technique using plain white fabric so I can use other colors of ink.  On this one, if I tried to add other colors, they blended with the background and lost their impact.  Oh well, I still enjoyed playing with different styles of writing and will do some practice on paper before the next attempt.

Wednesday, September 14, 2011

Fun New Book!!!

    Last week I ordered a new book from Interweave Press, Sew Wild, by Alisa Burke. and received it on Monday.  Since then I have been facinated by all of the great processes and projects included in its colorful pages, AND there's a DVD which inspires to the max.  I have resolved to work my way through the entire book, one technique at a time.


     This is a partially-completed piece which started out as a 15 x 18 inch gelatin print that I didn't like very much (Alisa used white broadcloth in the book, but I decided to recycle).  The rest is black Sharpie pen and a lot of fun doodling. I actually finished it last night and already have plans to tear it up for bits and pieces here and there.  I can visualize at least one Art X 3, and the book has loads of ideas for using scraps.