About Me

My photo
Michigan/Arizona, United States
I am a textile artist who loves to design fabric by painting, printing, stamping, and manipulating cloth.

Sunday, March 27, 2011

Organization Sunday 3

    Another visit to IKEA and a few tweaks to my work space:


     I found this wooden lazy Susan in the kitchen section and added an inexpensive rubberized mat to the top.  It holds all of my pens and pencils, a few adhesives, and tucked behind is a box of baby wipes--very necessary to the mixed-media process!


     Another one of my IKEA finds--a wire desk-top letter file which perfectly holds my works-in-progress.  I always have several projects waiting to be finished, and this small stacked bin keeps them handy, organized,  and in plain sight.  I can keep all of the various bits and pieces together until inspiration (or a deadline) hits. 


     My favorite part of this wire bin system is that I can remove one section and carry it with me to my evening workspace (comfy chair and TV) where I can do handwork (beading/embroidery) or into my wet studio where I can add paint, etc.  Love it!!!


Wednesday, March 23, 2011

A New Source of Inspiration!

   Last week I stopped by my favorite thrift store (where I buy good quality white bed sheets for my painting/ printing substrate) and found a new section to plunder--LINENS.


     This pile includes placemats, napkins, and a table runner with beautiful lace all purchased for under $10.  I took them home, washed and ironed them, and created this: 


     I had so much fun putting this journal together.  Using the bright placemat as a base, I cut up and layered the napkins, added the lace trim, and finally my bluebird (which I sketched and handpainted on muslin).  The words were printed on vellum, cut out, and sewn down by machine.  Finally, an old button for trim!

Tuesday, March 22, 2011

Felting Process

     This is a project that I worked on last week and actually took some pictures along the way.


    After pulling my silk hankies out of the fibers box, I chose a bright green piece with some reddish tints running through it; I wanted to make something that looked like Spring  (I know it's still snowing back in Michigan even though the temps in AZ are hovering in the high 80s).  After settling on my color scheme, I selected several hanks of green wool roving, hand-dyed scrim, green, red, and blue yarn scraps, and finally some green organza.


First , I spread three shades of green wool roving across a piece of Rit-dyed cotton batting.


     Here is the piece after felting down all of the various selections of fiber.  The left side has been left without embellishment because it will become the back of a journal.  On the right, I have conciously laid out a pattern of red and blue flowers using bits of yarn.  If you click on the photo, you will also be able to see where I have sewn down organza leaves along the vines.  I free-motion stitched across the entire piece using an easy leaf pattern.  It is now ready to be trimmed and edging applied before being stitched into a journal.


And here is the finished journal.


Sunday, March 20, 2011

Organization Sunday 2

Posting two days in a row--Wow.  I really am capable of sticking to a plan (for a short time, anyway).  And I do like the idea of getting more organized in small, underwhelming projects.  One a week--I can handle that . . . .


     As seen above, I already have some semblence of an organized system:  wonderful shelving unit from IKEA, storage boxes, even labels on most of the boxes.  However, if you pull out almost any box and look inside--CHAOS.

    
     This is what would greet me when I pulled out my box labeled Fibers:  plastic baggies filled with wool roving, silk roving, silk hankies,  embroidery flosses,  yarn scraps, hand-dyed threads, and one large bag of
MISCELLANEOUS.  In order to find anything, I'd usually have to haul out the whole mess and sort.  So--


     These two sizes of small plastic boxes were purchased quite inexpensively at my nearby Hobby Lobby and work perfectly.  The larger ones are around 7x5x4, and the smaller ones, 3x5x3.  I separated the wool roving into warm and cool colors, and so on, labeling each box on top.


     Here are my flosses (cool box, warm box), my own hand-dyed threads from a class, yarn scraps (still in semi-sorted baggies) and finally a small open box with cards of special embellishments, etc.  Wowsie, I'm impressed!!!


     And finally, my unbelieveably organized stash of fibers!!!!  The plastic boxes stack easily inside the storage box in three layers.  I do have to unstack to find a specific box, but I try to keep the least-used items at the bottom.  Anyway, so far this works for me.  Hmmmm, what next?

Saturday, March 19, 2011

Quick Post


This will be a short one just to catch up on a previous entry before trying to share everything from this week at once!!!  I still haven't gotten into the practice of doing short blogs more often instead of letting stuff pile up.  I'll keep trying!!!


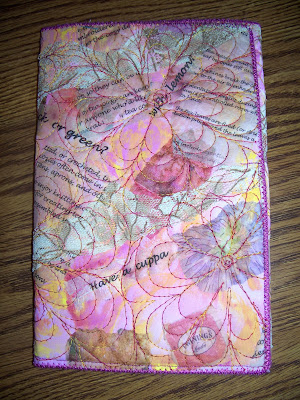
     This is a "portapad" cover made from the "Teatime" fabric shown earlier using printed teabags fused down to my gelatin-printed background. 


Here's the inside of the portpad with the right flap folded over a small legal pad.


     I took the left-over fabric and put together a little container to hold my box of favorite tea.  The box itself has a convenient opening at the bottom through which you can extract one teabag at a time.  I love it.  So, when I constructed my fabric "teabag caddy," I also made a slot at the bottom and a lid on top.  Works beautifully!!

Sunday, March 13, 2011

Organization Sunday

     OK.  So I decided that I needed some motivation--both to blog and to get more organized--thus ORGANIZATION SUNDAY!!!  (We'll see how long it lasts).  Ever since constructing my desk using a hollow-core door from Home Depot, I have tried to figure out a way to install some kind of drawer under the space in front of my chair.  I simply couldn't find any undermount drawers for less than several hundred dollars (my whole 8x3 worktable cost less than $80).  Enter IKEA:  I stopped on my way back from Tucson last week and found this--for $10.99:


     You probably can't tell very well from the photo, but it is a metal sliding support for a computer keyboard that fastens to the underside of a flat surface. 
 
     And this for $4.99:


     It's kind of a felty, plastic drawer divider which should hold all of my various and sundry stuff, once attached to the hanging support (I hope).


     I made little marks on the underside of the "door" where I wanted the "drawer" to hang (you can see them if you look closely), then removed everything from my work table and flipped it upside-down.  I got out my trusty electric drill and laid out the template included with the "drawer."  Drilling into a hollow-core door is a bit tricky, and I had some trouble, but at last, the anchors were pounded in, and I was able to screw the whole thing into place!!!!. 


     I fastened the drawer liner onto the keyboard pad with double-stick carpet tape, and Yippee Skippy, it works perfectly!!!!!  Can you tell I'm a bit proud of my handiwork?  I'll have to be careful not to put anything too heavy in the drawer, or lean on it (as I am wont to do), but on the whole, this is exactly what I wanted--a place to store necessary stuff that took up too much room on my work surface.   

Sunday, March 6, 2011

One product and (finally!) one process!

     I completed another sheer fabric applique (but forgot about taking pictures along the way again).  I designed this one for my portapad pattern, and it turned out OK.  Trying hard to remember all of the problems I had with the first attempt, this one was a lot easier altogether.  Still a few tweaks, but on
the whole, I enjoyed the entire process. 


I added small pieces of copper for a little bling, but the narrow strips don't show up very well in the photo .  I also used copper embroidery thread to delineate the center of the flower.

     As for my bragged about process:  step-by-step (well, I left out a few) photos of using teabags to create collaged fabric.

The above photo shows one of my pieces of gelatin printed fabric which I used as background.

These flower photos were all stored in my Photoshop files.  I cropped them, using images that would compliment the background, collaged them onto a blank page, then printed it on teabags taped down to a sheet of printer paper.  (See tutorial by Judy Coates Perez.)

Here the printed flowers are simply laying on top of the background fabric.  I added Misty Fuse to the back of each print, being careful to use parchment paper both front and back as I ironed it on.  Right now there are a couple of missing steps because my photos weren't clear enough to publish:  a printed a sheet of  tags off tea bags, text downloaded from the internet about the history of tea, and some short labels.

This is actually the finished piece.  Steps not shown:  tearing the flowers apart and placing them around the background before ironing them in place; same for the tea tags; then the text.  Finally the labels were scattered strategically across the whole piece.  I added loosly-cut strips of antiqued-lace fabric, then batting and backing, and free-motion stitched in an easy echoed-flower pattern.  I have an idea of how I'm going to use the fabric, but probably won't get anything completed for several days.