About Me

My photo
Michigan/Arizona, United States
I am a textile artist who loves to design fabric by painting, printing, stamping, and manipulating cloth.
Showing posts with label art journaling. Show all posts

Saturday, October 22, 2011

Journal Page and some more Mipad Covers

    I hadn't journaled for over a month and decided to add a few pages between other projects.  I got out my Gelli Pad (a commercial gelatin plate which is reusable) and prepared it for printing--acrylic paints, texture items, hand-made stamps, brayer. etc.  I also prepped pieces of white fabric, deli-paper, dryer sheets, and my journal.  Because I didn't want my journal pages to be too intense, I did a first pull using the other substrates and used my journal for the second pull--it worked pretty well  (I have lots of plans for the first pull pieces!).


     Here are the first set of journal pages in which you can you can identify the different texture used.  In the evening, I sketched over this background using a Pitt pen, and yesterday I painted my sketch using watered-down acrylics and some dimentional paints.  Really fun!!!


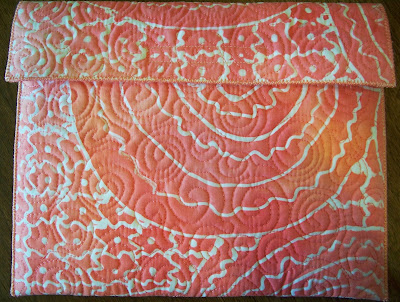
     It seems like I covered up most of the background, but in real life you can see through the painted flowers and find the textures. (Now to magnify the page is a two-step process:  first click on the page--it comes up on a black background; then click on the small print in the lower left-hand corner.  It should appear as before--clearly enlarged.)  I may print this pattern on fabric and use it for something.  Also yesterday, I finished up my prepared Mipad Covers:


     This cover was constructed from a piece of glue-resist fabric (fun to play with),


and another piece of glue-resist--this time open,


and finally, another cover using collaged fabric.  Done!!!


Tuesday, September 13, 2011

Vintage Pages completed

     These pages are a lot different from my previous work, but I did enjoy using more paper than paint for a change (I do miss the colors!).


     This was my mother's cousin, Catherine, who lived nearby in a beautiful home (her husband was a lawyer) while I was growing up.  I used to babysit for her when I was in high school.  Fond memories. . . .


     My favorite aunt, my mother's sister, Lena.  She and my uncle had no children, but they had a knack of making me feel welcome--I loved going to visit.  Aunt Lena was a fastidious housekeeper and always dressed beautifully.  She became my girls "grandmother" after my mother died, and made them her special companions.  She lived to be 92.


     And my Mom. She was a stay-at-home wife and mother who was always involved in many activities and valued education (she had put herself through college as a nanny).  She loved to sew and made most of my clothes, including several beautiful prom dresses.  Unfortunately, she died of breast cancer in 1965 at the age of 56.  I was only 26 (do the math) and my daughters were 4 and 1 years old.  Karen has vague memories of her which involve food, but Amy has none.  I regret that Mom and I didn't really get to know each other as adults, but I had a wonderful childhood.

Sunday, September 11, 2011

In Memory of. . . .

     The past few days I have been putting together several journal pages which commemorate four women who shaped my past:  mother, aunts, and second cousin.  All of the pages have a vintage feel since the women were all born in the early part of the 1900's.  I'm going to show a few details of how the pages were created:


     These scraps were taken from old sheet music and the pages of a ladies' magazine, Modern Priscilla, published in 1923.  I found several of these magazines last winter at an antique shop in AZ and have been using little bits of them in my collages and journal pages ever since.  Love them!!!  The paper practically melts onto the page.


     Next, I washed over the scraps with watered-down gesso, then added a bit of color using a purple Caron d' Ache water-soluble crayon and some pieces of wonderful old gift wrap (found in another antique shop, this time in Monterey, CA).


     I used my script stamp and two home-made ones for the next layer.  The pictured stamps were constructed using sticky-backed fun foam and a ballpoint pen--they take a bit of muscle, but are really quite fun to make (Melanie Testa has a great tutorial on her blog).


     These lines from one of my favorite poems, "Dirge without Music" by Edna St. Vincent Millay, were printed on my old standby--teabags.


     The finished page:  I added a window and woman from the magazine, the engagement portrait of my dad's sister, Valda, as well as the first stanza of the poem (words meld into the background a bit--which is probably good--the poem is a bit maudlin).  After adding a bit more color wash, I filled in the flower petals with darker purple. The other three pages will all be similar--using basically the same materials and format.  I'll publish them together when finished.

Thursday, September 8, 2011

Journaling Work Space

    A quick entry to show you the COMPACT area in my kitchen where I work on art journaling and other mixed-media stuff:


     This what it looks like at the end of the day after I've put everything away!!!  I'll try to remember to take another picture of "work in progress."  Yikes.  (Hmmmm, I also need to remember to staighten that picture.)

Wednesday, September 7, 2011

And Some More

     I am working on other projects, but my journal pages seem to be the only thing I'm really completing right now.  The following pages all involve flowers (a diversion from birds!), stencils, stamps (again my favorites), a few Tim Holtz butterflies, and a flower quote printed on tissue paper and put down with gel medium.  I like the results, but I think I need to branch out and try something new.  Stay tuned.


     As you can tell from the above pages (as well as most of my other journaling entries), I seem to work best when I pick a "theme" and use the same processes to explore it for a few pages.  Having a very small space in which to work on my journaling, I find that limiting the supplies used for a project keeps the clean-up time to a minimum.  I can easily put all of my chosen work items and ephemera into my Current Project box until finished.   By the way, this "art corner" is in my kitchen!!! 

Monday, September 5, 2011

More Journal Pages

     I'm trying to get into the habit of posting several time a week, so I'm sharing some pages that were finished quite a while ago (actually when I was out in Rhode Island visiting my daughter, Karen).  These pages all involve a bird of some kind.


       Because I had just used a coupon at Michael's for Tim Holtz's resist paper stash, I decided to use bits and pieces for the next few pages.  The flying swallow was cut out from one of his pages as well as small scraps of music.


     Here the TH paper was torn and glued down, then stenciled and stamped over.  I used my "go to" script stamp as well as one of my homemade erasers.  The condor head came from National Geo (I was lucky enough to see one in person several years ago at the Grand Canyon).


     The prairie chicken is again from National Geo (they have the best bird photos) and the TH paper is a vintage-looking account entry.  I thought this seemed appropriate since this bird is very endangered.  Stamps are script and "eraser."


     This one was just for fun!  The bird and the egg didn't really belong together, but the "expression" on the crane's face fits. 

Wednesday, July 27, 2011

More Pages and a Step-by-Step

     Two days in a row!!!  I decided I'd better do this now since tomorrow I'll be heading out to Rhode Island to visit my other daughter (I also have trouble with internet there) for @10 days.  So, I'm showing a few more finished journal pages and a mini-tutorial on how they were created.  (Remember if you want to view any of the pages more closely, simply click on the page and it will enlarge!)


     This one's blurry (sorry!).  I tried several times to take a clear image, but I think the shiny colors interfered with my camera.  I decided to publish it anyway. . .


     As I said in an earlier post, all of these pages were created using a very limited set of materials.  Yesterday, while making my final pages, I decided to record the process step-by-step to help me remember and to share the fun:


This magazine image of an interesting woman was my inspiration--she will appear on the finished page.


     This layout shows the first and seconds steps:   I found some paper scraps that seemed to fit the colors from the magazine image:  blue, violet, and black.  After tearing the papers into pieces and collaging them on the page w/gel medium, I filled in some of the white spaces w/Neocolor II watersoluble crayons.


     I brushed the crayon colors with water and spread them around  (always heat set carefully between each application of color). I then selected three Portfolio water-soluble oil pastels, again dark blue, violet, and black.


     This time I chose to draw square shapes acoss both pages with the three colors.  The next step will be to brush over the pastels w/white gesso and heat set.


     After finishing each gessoed square, I used the pastels again around the inside edges and brushed with water to move color across the center spaces (I find that oil pastels don't spread as easily as water-color crayons).  Again, heat set!


     The final step with pastels was to outline the outside edges of each shape and rub them gently with a damp baby wipe.  This should dissolve most of the pastel while leaving a frame of color.  HS.  (I like how the background shows through on most of the squares,) 


     Now it was time to stamp.  I used black Staz-On ink with  both my hand-carved eraser (small circles within circles) and my favorite script block stamp across both pages.  You don't have to heat set permanent ink, but just make sure it is completely dry before proceeding.


     The finished page:  I cut out the woman (disguising the famous designer by cutting apart his name and attaching some of it upside down) and finally selected three circular images of "cool" fungi.to add balance.  The title was written by hand using first a brush marker and then close dots of Inkessentials Enamel Accents (love them!) in black.  (I didn't heat set the enamel because I wasn't sure how it would react; I did leave the book open overnight to make sure it dried completely.)  I'm happy. 

Tuesday, July 26, 2011

Still Struggling

     I had good intentions of blogging every 2-3 days, BUT. . .  I have been visiting one of my daughters at her cottage in upper MI and my internet doesn't work there.  I did, however, take a few of my journaling supplies up with me.

     These included:  gel medium,  Portfolio water-soluble oil pastels, water-soluble crayons, Golden transparent yellow oxide, a black ink pad, and my box of stamps (I only used one script stamp and my set of hand-carved erasers).  I also brought a folder of scrap papers and my collection of magazine images.  With these limited materials, I produced five double-paged journal entries and had a lot of fun!!!


     Since I feel that I learned a lot through using only a few supplies, I have decided to continue with these same materials for the next few days.  I really like to work around a theme (my first journal pages all included a small inset of a "carved" woman's face {downloaded from Milliande's Art Journal free pages} and a picture of a bird).  These new pages will all use a magazine photo of a woman to match the colors and other items that seem to fit.  I'm still having FUN.

Sunday, July 17, 2011

Long Time; No Blog

     It is very hard to come back after being gone so long--I've forgotten how to do Stuff!!  I'll probably spend most of my time editing after I finally post.

 Anyway:  1)  I'm back in Michigan  2)  I spent the whole month of May birding with my buddies  3)  I worked hard the month of June playing catch-up and working at the shop  4)  I made a life-altering decision to change from being a member/owner of the Imagine That artist's co-op, to simply becoming a consignment artist.  5)  I've been having a whole bunch of fun expanding my art-journaling techniques.

A wonderful art journaler named Paula Phillips, better known as journalartista,  has a set of  beautifully informative live videos on Ustream, and I am totally hooked.   I've started journaling every day and am also in the process of setting up several more journals for different purposes.  I LOVE IT!!!  I am still:  1) doing art projects for the shop  2)  cleaning my basement  3)  organizing my stash, books, drawers, etc., etc., etc.  BUT I now have time to play, and I'm wallowing.


     The above are two examples of pages in my working art journal.  I usually begin a new page spread after dinner one day and finish it the next morning before starting other projects.  Right now I am experimenting with new paint and paper techniques, so every new page is a challenge (sometimes an uphill battle!), but I find you don't give up on a page--you just add another layer.

Saturday, April 2, 2011

A Few More Pages

     OK, so I'm stalling.  I really should be painting some fabric background for one last project that needs to be completed before heading home, but. . . .


     Hands are facinating.  Besides our big brains, the structure of our hands is what makes us human.  My anatomy book provided some great design possibilities, so I cut out each piece, intertwined the fingers, and made the first page of another section:  Hands.  Not sure what will follow, but I've got some ideas.


     And another section:  Self.  I had fun picking out the papers for the letters, the pictures of me were all lifted from photos taken Christmas 2010 by one of my grandchildren, but the background paper (too shiny) doesn't translate well.  I may end up adding some black pen scribbles or something to tone down the GREEN.


     Can you tell this is my first self-portrait?  Ms. Frankenstein.  OK, so it's another blind drawing (which probably needs a blind viewer, too), prompted again by Jane Davies.  This time I needed a mirror (had to purchase one at the dollar store!) and a white crayon.  Looking at myself in the mirror, I drew my face (?) with the white crayon on white paper (couldn't cheat even if you want to), and then painted over the result with watercolor.  Why did I choose green, AGAIN?  This is a very humbling experience, but at least I can use the excuse that I couldn't SEE what I was doing.

Friday, April 1, 2011

A Journal of My Own

    This past week I have been taking a bit of a break from creating items for my shop back in Michigan .  For one thing, my time here in AZ is growing shorter; two, I wanted some playtime; and three, I ran across a couple of new blogs that really stress the importance of personal art journaling.   iHanna's blog led me to create a new kind of journal--an altered book.  I found found several good choices at a thrift store and selected an old anatomy book for my first real attempt at creating a personal journal. 


     Mr. Muscles is actually one of the frontpieces of the anatomy book; I added my own chipboard words which will become the title of my journal.  I haven't done anything to the book's cover yet, but I'm processing ideas.  I removed about half of the pages of the book since it would become too cumbersome with all of the additions I will make in my journaling.  I will also be dividing the journal into sections, alloting 10-12 pages per section. 


     Another frontpiece of the old book which I had to keep.  One of my daughters is a high-school English teacher who loves Shakespeare; I added my own comment  (seemed appropriate).


     Here are a couple of the pages torn from the old book:  I cut them into strips, wove the pieces back into one page, and refastened it into my journal. 


    After gessoing over the back of the woven insert, I added my message, and then used water-color crayons to put some color back into the design.  (I am using red and blue for the first few pages of my journal  to give homage to the flesh and blood represented in the pages of any anatomy book.)


     This is the last page of the intro part of my journal (a few pages weren't shown here), and it leads to the next section:  BIRDS.


     Only semi-sucessful page--the message of stamped letters on painted tissue paper (also from Hanna's blog) worked beautifully, but the background is way too dark.  I took some of my hand carved stamps, placed a piece of printer paper over them, and used the edges of Crayola crayons to rub patterns of the stamps onto the paper.  That part was OK, but when I added paint over the top, I lost a lot of the color.  Oh well, the chickadee was my focal point, anyway.


     A quickly-collaged page calls to mind a super fun birding trip this winter with friends from Michigan.


     A "lovely" piece of art,  this shows one of my first blind drawing attempts (prompted by a blog session with Jane Davies) in which I closed my eyes, thought "bird" and started drawing.  Yikes!!  I added the color with my eyes open, thank heavens.  It was fun, and I'm adding it to my bird section--it's my own personal art journal, after all.


      And another. . .  I thought this looked a bit Picassoesque (sp.)  No comments, please.


     Really do like this one!  I had drawn these warblers during the winter for some small notepads and still had the masters, so I printed them on tissue paper.  After cutting around each bird, I adhered them to a piece of cardstock with gel medium and colored the spaces with water-color crayon.  I activated the crayon, cut out a bunch of leaf shapes from some painted tissue paper, and gelled (?) them down, too. 

     I actually have a couple of more journal entries ready to post, but I'll save them for later (I know, this entry is way too long already!!).  Some ideas about other sections wanted to get put onto paper. That's probably how I'll function with this journal--ADD is my friend!!!.