

This one's blurry (sorry!). I tried several times to take a clear image, but I think the shiny colors interfered with my camera. I decided to publish it anyway. . .

As I said in an earlier post, all of these pages were created using a very limited set of materials. Yesterday, while making my final pages, I decided to record the process step-by-step to help me remember and to share the fun:

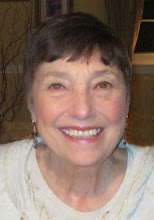
This magazine image of an interesting woman was my inspiration--she will appear on the finished page.

This layout shows the first and seconds steps: I found some paper scraps that seemed to fit the colors from the magazine image: blue, violet, and black. After tearing the papers into pieces and collaging them on the page w/gel medium, I filled in some of the white spaces w/Neocolor II watersoluble crayons.

I brushed the crayon colors with water and spread them around (always heat set carefully between each application of color). I then selected three Portfolio water-soluble oil pastels, again dark blue, violet, and black.

This time I chose to draw square shapes acoss both pages with the three colors. The next step will be to brush over the pastels w/white gesso and heat set.

After finishing each gessoed square, I used the pastels again around the inside edges and brushed with water to move color across the center spaces (I find that oil pastels don't spread as easily as water-color crayons). Again, heat set!

The final step with pastels was to outline the outside edges of each shape and rub them gently with a damp baby wipe. This should dissolve most of the pastel while leaving a frame of color. HS. (I like how the background shows through on most of the squares,)

Now it was time to stamp. I used black Staz-On ink with both my hand-carved eraser (small circles within circles) and my favorite script block stamp across both pages. You don't have to heat set permanent ink, but just make sure it is completely dry before proceeding.

The finished page: I cut out the woman (disguising the famous designer by cutting apart his name and attaching some of it upside down) and finally selected three circular images of "cool" fungi.to add balance. The title was written by hand using first a brush marker and then close dots of Inkessentials Enamel Accents (love them!) in black. (I didn't heat set the enamel because I wasn't sure how it would react; I did leave the book open overnight to make sure it dried completely.) I'm happy.
Love your pages and your step-by-step, thanks so much for sharing this.
ReplyDelete