About Me

My photo
Michigan/Arizona, United States
I am a textile artist who loves to design fabric by painting, printing, stamping, and manipulating cloth.

Saturday, May 26, 2012

More Sunprints

This is my busy month:  I've been birding (birdwatching) since the last weekend of April, traveling to the Upper Peninsula of MI. down to Ohio, then into Ontario (Point Pelee) and finally up to Tawas Point in eastern MI. Whee.  Lots of birds. fun with good friends, and snatching a few hours of fabric painting in between trips!!


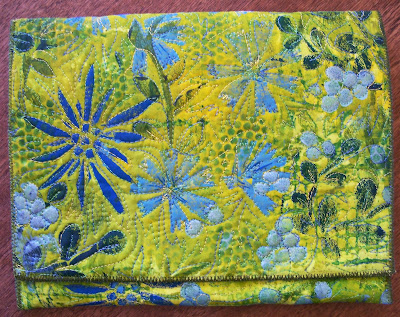
     I sunprinted this piece with leaves picked outside my back door, then added texture with some punchinella dots and small stamped flowers--really simple, fast and fun.


This is one part of the whole piece after quilting with varigated thread,


 a somewhat enlarged view of the pocket piece.


and the finished MiPad cover.

Friday, May 4, 2012

Pink Celery Roses

     My eldest daughter informed me that she loved my green celery roses and wanted the resulting cover for her iPad.  However, she also said that she has been wearing a lot of pink, so I decided to try another celery stamp.  Here are two samples of the new roses so she can have her pick--old green, Pink 1 or Pink 2 (her birthday is coming up SOON).


Pink Celery Roses I is already completed.


Pink Celery Roses II is cut out and ready. 

OK, sweetie, make your choice.  I'm taking taking the "leftovers" in to consignment tomorrow!!!


Thursday, April 26, 2012

Celery Roses

    I bought a fresh bunch of celery this week and after trimming the bottom off, I remembered once using the remains as a "stamp."  However, this being a busy week, I set it aside and left it to wither.  Hmmmm.


Since results still looked tempting, I set up my printing tools and chose my paint colors--greens again with a touch of blue.


Below is the quilted body and pocket before trimming. . . .


and the resulting MiPad Cover.
  

Tuesday, April 24, 2012

New "MiPad" Covers

     I have been working hard this past week trying to turn the new fabric I created in AZ into covers for iPads (or other electronic tablets).  This involves "painting" (actually a quick wash of color) fabrics for the lining, free-motion quilting the top layer (fabric, batting, backing) and the lining (fabric and felt), bonding the two layers together, adding a pocket, and finishing the edges.  Whee.  Lots of steps, but I enjoy them all.


     I'm having problems with my server or the new format of my blogger page, so I can't publish anything more.  I'll try again later.


Sunday, April 22, 2012

And More Fabric


     On this piece the stencil outlines show clearly in the background.  I really want to start using natural materials as "masks" (in AZ leaves and small flowers are in short supply), but will have to wait until time and weather cooperate here in MI.


     Here I tried using artificial flowers over the paint to make my initial print, but unfortunately, the silk flowers were too transparent to shut out the sun's rays.  There were some partial prints, but nothing very distinct.  Oh well, I went ahead and stamped over it with my own "flowers."

Thursday, April 19, 2012

New Fabrics

     Just before leaving Arizona, I experimented with a new process (for me) using my old standby fabric paint--Setacolor.  Although I had always known about its sun-printing qualities, I had never tried it out.  OH MY!!!!  Now I'm hooked, big time.  However, what was easy in AZ (with 10 hours of bright sunshine nearly every day) is going to be a challenge here in Michigan--especially in the unpredictible spring weather.  Luckily I did print up several pieces before my return to gray skies:


     I first painted my base (recycled white sheets) with several shades of green Setacolor and placed two or three plastic stencils across the surface.  I then carried the print pad (plywood covered with felt) out onto the back padio and placed it on a table in full sun. It didn't take long for the prints to appear, but I waited until the paint was completely dry before removing the stencils.  The wierd thing is--the lighter areas appear under the areas that are covered.  Hmmmm.  After heat setting, I printed directly on the fabric using the same stencils and some of my stamps.  This is really a fast and fun process!


      Mipad Cover using the new fabric.  I love it!

Wednesday, April 18, 2012

Quilted Collage

     OK.  I'm back in MI and getting things organized, AGAIN.  No excuses for not blogging (both my camera and Photoshop were giving me fits), but I'm determined to try AGAIN.


     I love putting together these small 12 x 12s from left-over bits and pieces.  This one contains scraps from my gelatin prints, some older screen printing, one length from a fabric-pen design, and several "new-process" pieces (more about that later!).


     After fusing the background onto a square of felt, I zigzagged the edges and free-motioned each individual piece.  Then came the fun part--more digging and sorting my pile of trimmings from previously quilted projects.  Selecting several in the "right" colors, I cut them into small squares and rectangles, laid them out across the collage, and stitched them in place.  I'm calling this one "Spring Song."


Saturday, February 4, 2012

"First" Quilt

     I have been BUSY, but not with my camera!  I keep forgetting to take pictures of the many things that I have been doing every day:  finishing another Prayer Flag; teaching fabric painting to a small class from my quilting group (larger class next Thursday); cutting and putting together blocks for my quilt; and starting my second 12 x 12 piece.  Anyway, here is my "quilt" pinned onto my design wall.


     I may still switch some blocks around to balance the colors, and I'm considering removing one row to make the quilt itself smaller and use the remaining blocks for a pillow.  I could hang the quilt in my bedroom here in AZ and put the pillow on my bed.  Still considering. . . .

Wednesday, January 25, 2012

Twelve Square 1

     OK, so I'm starting another new project. . . . inspired by a blog that I follow (Cynthia St. Charles again).  This time she is planning to create a small (12 x 12 inches) collaged quilt once a week until she reaches 100.  Yikes!  I know better than to even think about matching her goal, but I like the idea of creating something small and abstract, not unlike the prayer flags but less haphazard.  So here goes.


     I started with some leftover scraps from last year's projects (sound familiar?), added fusible to the pieces, arranged them into a "composition" on a square of felt, and ironed them in place. 


     After affixing each piece with free-motion zigzag, I dug out a paper chickadee (also from last year) and found a place for him that seemed to work, but I wasn't satisfied with the center of the background.  Soooo, I sorted through my scraps again, added  five more pieces to the whole, and was much happier with the result.


      Now the chickadee is stamped on fabric and painted with acrylic paints, fused to felt, and cut out to perch on a branch in the tangle of branches and berries.  Really fast and fun.

Monday, January 23, 2012

Prayer Flag 4

      I finished my fourth prayer flag in just a little over an hour this morning.  Keeping a handy bag of scraps with little bits and pieces of various projects and a folder of leftovers from this summer's journaling makes it easy to sit down and put together a new flag quickly.


       The crows and "target" were a test stamp on paper which I printed (copied actually) on a scrap of fabric taped to printer paper; the shiny piece at center bottom is a crumpled candy wrapper found in a pocket;  the bright pink items are actually bougainvillea blossoms which I picked up in the street (they are covered generously with gloss medium to adhere and protect); and finally, the letters were constructed from black fabric which was free-motion "quilted," painted with Lumiere, cut out individually, and glued down with fabric adhesive.  This flag soon joined my other flags on the patio.

Sunday, January 22, 2012

First "Scratch" Quilt

  Since joining the quilting group at my RV park in AZ, I am challenging myself to create enough of my own hand-painted fabric to construct a small quilt. I decided to start with 8 fat quarters using three basic colors:  purple, green, and yellow. 


Saturday, January 21, 2012

Another Quickie

     I'm really trying--to get back into blogging everyday (opps, skipped yesterday--went on a (quilt) shophop, visited a really impressive Art Quilt Show in Chandler, AZ, had a super time, and spent some money).  I also have to start remembering to take more photos of my work in progress--out of that habit, too.


     This potholder was made using the simple collage, messy stitching method I used to make some of my stash boxes, but the bindings were new for me.  Back in MI when I constructed other holders, I had lots of fabric to make the bias edges--here my stash is limited, so I purchased a pack of blue tape.  Not happy with the look of the plain blue, I dug out my small eraser stamps (used this summer in several of my journal posts) and stamped along the length of the tape with three colors of fabric paint.  I'm very pleased with the results and will definitely use this process again!

Friday, January 20, 2012

And Again. . . .

    OK, no more excuses!  I've just been lazy and gotten out of the habit of blogging--so even though New Year's resolutions should have already been in place, I'm going to try again. 

    For a quick catch-up:  I am no longer a member of the artist's co-op back in Michigan (except on consignment); I have joined a quilting group here in AZ; I am still creating my own fabric; I am playing with new ideas and processes; I am having fun!!!

    One quick project which I have been trying is to create a "prayer flag" each week (see Jane La Fazio's blog).  These small hangings are put together with various scraps of printed, painted, and purloined "fabric" (and anything else that is just laying around) with one word that inspires me to create.  Very fun and relaxing to make.  I have them hanging outside on my back patio.


     Since they only measure @ 6" X 10" it is sometimes difficult to work in the message, but that is part of the challange.  I'm trying to come up with different ways of creating the letters each week.  (We'll see how long that lasts. . .)


     Prayer Flag #3.  Monoprinted background, printed scraps, a photo transfer (transparency w/gel medium)
from a trip to Mexico, pieces of a cut-up placemat, and seedpods.  Simple and satisfying.


Sunday, December 4, 2011

Painted Totes

    Last week, I spent my time painting canvas and fashioning the results into totes.  I'm not super happy with the results, but I had fun doing it.  On Sunday, I was up in Carefree, AZ for my younger daughter's birthday, and I took my totes and camera out into the scrub for some pictures:


     I'll probably try to sell these here at the Shopper's Market.  Right now I'm gelatin printing and experimenting with some new techniques.  Also going to try to get back into the habit of blogging more often!

Friday, November 25, 2011

My Hidden Mess!!!

     So far, when sharing  my AZ studio space, I've only show photos of my wonderful large room where I spend most of time each my day.  However, I also have a small "wet room"  (actually my laundry) in which there is a "slop" sink and workbench.  This is where I do most of my fabric design--painting, printing, stenciling, etc., and where I can make a BIG MESS and then shut the door.


Painting cactus on canvas to be made into totes.


Another view of the workbench


Slop sink---the real mess which seldom gets cleaned---but is my favorite part of this small room.


     The surface of my washer and dryer is a perfect place to lay out my fabric pieces in so I can work on several things at a time. 


Thursday, November 17, 2011

More Stuff


     Here's a pile of leftovers from previous reorganizating.


     So I made my first (this season) trip to IKEA, and after a few hours of sweating, swearing, cranking  screws and hammering pegs:  BEHOLD the new book unit.  It sits just inside my studio's sliding glass door where I come in from outside, has a handy place for my purse, keys, and sunglasses (I need to find some cool little holders), fits my baskets, holds books, and still has empty spaces waiting to be filled.  Love it.


     For a little additional spiffing, I quickly put together this backrest using a thrift store tablecloth I had picked up last year and a cheap body pillow.  I cut up the cloth and sewed it back together in less than a half hour (just don't look too closely)!  Now it needs a few additional throws. . . .

Wednesday, November 16, 2011

Back Again--in Arizona

    Finally settled--almost. . . .  It always takes me a while to get everything (and I mean a lot of stuff that somehow gets stuffed in my car and follows me to AZ) unpacked and stashed away.  I headed west on November 4, arrived on the 6th, and yesterday was the first day I really started doing ART!!!


     I brought sooooo much more stuff with me this year and really had no place to put everything. . . .  (had to make several emergency trips to JoAnn and Michaels for more storage and do a lot of restructuring) but at last, I'm almost functional (at least my worktop is).


Ahhhhh.  Note small stuff box made especially to fit my NeoColor II crayons, Pastels, Grafitint pencils, and various sets of artist ink pens.  Love it!!!


Tuesday, October 25, 2011

Another Page

     I've been really busy the last few days helping a friend with costumes for her middle-school play, but I did finish another sketched and painted page in my journal:


This is the background printed last week with my Gelli Pad.


And the final result:  I'm not as happy with this one--I think the flowers are too large and too much of the background is covered up. 


Saturday, October 22, 2011

Journal Page and some more Mipad Covers

    I hadn't journaled for over a month and decided to add a few pages between other projects.  I got out my Gelli Pad (a commercial gelatin plate which is reusable) and prepared it for printing--acrylic paints, texture items, hand-made stamps, brayer. etc.  I also prepped pieces of white fabric, deli-paper, dryer sheets, and my journal.  Because I didn't want my journal pages to be too intense, I did a first pull using the other substrates and used my journal for the second pull--it worked pretty well  (I have lots of plans for the first pull pieces!).


     Here are the first set of journal pages in which you can you can identify the different texture used.  In the evening, I sketched over this background using a Pitt pen, and yesterday I painted my sketch using watered-down acrylics and some dimentional paints.  Really fun!!!


     It seems like I covered up most of the background, but in real life you can see through the painted flowers and find the textures. (Now to magnify the page is a two-step process:  first click on the page--it comes up on a black background; then click on the small print in the lower left-hand corner.  It should appear as before--clearly enlarged.)  I may print this pattern on fabric and use it for something.  Also yesterday, I finished up my prepared Mipad Covers:


     This cover was constructed from a piece of glue-resist fabric (fun to play with),


and another piece of glue-resist--this time open,


and finally, another cover using collaged fabric.  Done!!!



Wednesday, October 19, 2011

Finished Covers

     Yesterday I took some completed Mipad Covers into the shop and actually remembered to take pictures of them first:


made from the collaged fabric


painted and stamped using a raised wallpaper pattern


and another leafy pattern.

     I have more fabric waiting to be made onto covers, but I'll probably hold off for a while and catch up on other stuff.  Actually, I am taking a trip to Africa in November (before heading  to AZ for the winter), and I really need to spend some time getting organized for both.  I'll keep you "posted."